
Wireless-Network: Setup for Windows XP
Student Wireless Configuration
WPA (Wi-Fi Protected Access) is the latest version of security for wireless networks. However, to use WPA you must be running Microsoft Windows XP with the following installed Microsoft updates:
Microsoft Windows XP Professional SP2
Go the IT office & fill up the Wireless form to give you access permissions to wireless services. Wireless service is free to only USP registered students.
Please note that the Emalus wireless service supports WPA.
Setup
Go to the Start menu > Control Panel > Network and Internet Connections > Network Connections.
Right-click on Wireless Connection and select Properties from the submenu that is displayed.
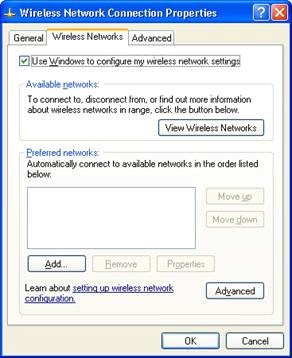
Select the Wireless Networks tab. Click on the Add button.
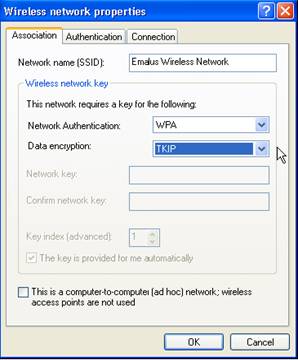
On the Association tab, enter Emalus Wireless Network for the Network Name (SSID) option.
On Network Authentication option select WPA.
For Data encryption option select TKIP if you had selected WPA for Network
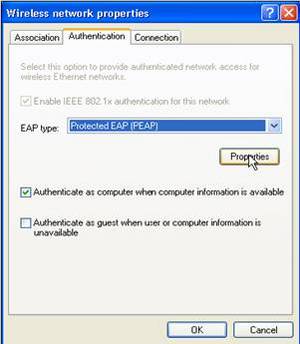
On the Authentication tab of the wireless network properties window, check the option for Enable IEEE 802.1x authentication for this network. For EAP type, select Protected EAP (PEAP) for EAP type. Select the option for Authenticate as computer when computer information is available, and then click Properties.
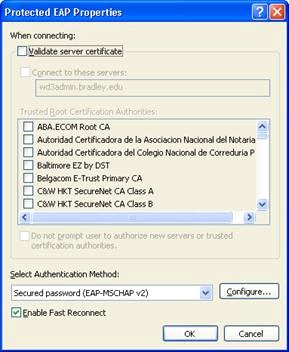
Remove the check from Validate server certificate. Select Selina Rosepassword (EAP-MSCHAP v2) for the authentication method, check Enable Fast Reconnect and then click Configure.
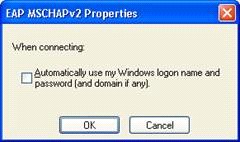
Deselect the option for Automatically use my Windows logon name and password (and domain if any). Click OK to accept this setting.
Click OK until you have exited from the Wireless Network Connections Properties.
Connecting to the wireless network
Once you have successfully configured the above settings you should see the following popup when the wireless network is in range.
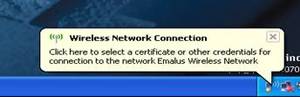
Click in the center of the bubble (not the “X”) to enter your credentials.
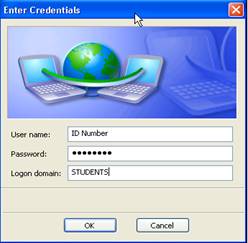
Inthe credentials box enter your Username (or Your ID number), Password (Provided by IT office) and Students or VANUATU (if you are a staff) for Logon domain, click OK.
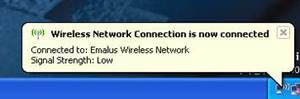
Once completed you should receive this popup message.
You should now be able to use the Secure Wireless Network